
Course Outline
13. Application Settings
Overview
Welcome to lesson 13 of 20 in the Trainer’s Course. In this lesson you will look at the steps to automate changes you make to the SuperNova and Dolphin ScreenReader output for different applications.
Lesson objectives
After studying this lesson, you will be able to:
- Correctly describe the purpose of Application Settings files and give three examples why you may wish to use them.
- Accurately describe the process to create an Application Settings file and explain the ways you can manage these files.
- Correctly describe the role of Situation Settings and their management within Application Settings files.
This lesson should take no more than thirty minutes to complete.
This lesson applies to:
- SuperNova Magnifier
- SuperNova Magnifier & Speech.
- SuperNova Magnifier & Screen Reader.
- Dolphin ScreenReader.
Application settings
If you or your clients regularly adjust SuperNova or Dolphin ScreenReader settings depending on the app in use, then you should consider automating the process with Application Settings files.
You may prefer, for example:
- To use a different magnification size when working in your spreadsheet compared to working in your word processor.
- To use a different Colour Scheme when browsing the Internet compared to browsing the messages in your email program.
- To set speech to announce numbers as digits, for example, 1, 2, 3, in your database but prefer speech to announce numbers as words, like one hundred and twenty-three, in your finance app.
- To create Visual Hooked Areas for specific apps.
Which settings are Application Settings?
Before you look at the steps to create Application Settings files, you should be aware that not all settings are Application Settings. Some settings are categorized as "General" settings and cannot be configured on a per application basis such as Mouse Pointer Schemes, Multiple Monitor options, Voice parameters like speed and volume plus Braille settings such as the Braille Translation Tables.
Settings that can be categorized as Application Settings include the following:
Visual Settings
- Magnifier On / Off.
- Magnifier Size.
- Magnifier View.
- Colour Scheme On / Off.
- Colour Scheme selection.
- Highlighting On / Off.
- Highlighting Scheme selection.
- Doc Reader Settings.
- Visual Hooks
- Advanced Options: Magnifier, Tracking and Line View settings.
Speech Settings
- Voice On / Off.
- Character Echo.
- Keyboard Announcements.
- Text Style Announcements.
- Verbosity Level.
- Read From Here: Enhanced Read from Here.
- Advanced Options: Cursor.
Braille Settings
- Braille Output On / Off.
- Input.
- Characters.
- Layout.
- Status Cells.
- Cursor.
- Verbosity Level.
- Braille Hooked Areas.
As you can see, the list of settings you can configure on a per application basis is considerable. Allowing you to automate many of the changes you may consider necessary between programs.
Creating Application Settings
You can create an Application Settings file in just a few simple steps.
To do this:
- Run the target application.
- Open the SuperNova or Dolphin ScreenReader Control Panel by pressing LEFT CONTROL + SPACEBAR. It is important to use the keyboard command to open the Control Panel as it ensures the correct app is identified by SuperNova and Dolphin ScreenReader.
- Open the "File" menu and then open the "New" submenu (ALT + F, N).
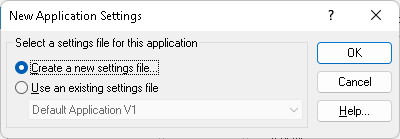
- Choose "Application Settings". This will open the "New Application Settings " dialog box.
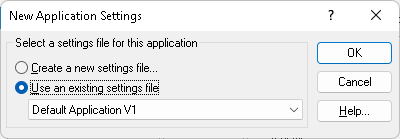
- Choose "Create a new settings file" and select the "OK" button.
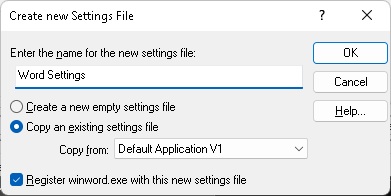
- Give the new Application Settings file a name, choose whether to create an empty settings file, which is just the internal factory defaults, or copy an existing settings file (recommended) and then Select the "OK" button.
And that is it. Your new Application Settings file will now be in use and saving each SuperNova or Dolphin ScreenReader setting you change while you are in your application.
Tip: You can check the Application Settings file currently in use by reviewing the Control Panel Status Bar. The opening text on the Status Bar reports the current Application Settings file in use. The Status Bar also states the current executable, which enables you to ensure the Application Settings file is being used with the correct app.
Creating Situation Settings
Situation Settings are a subset of Application Settings. Situation Settings apply to changes you may want to apply to dialog boxes within an app.
Perhaps you prefer, for example:
- Speech to announce each word you type in your document but require speech to say each letter as you type in the "Save As" dialog box to ensure you use the correct filename convention.
- A specific Colour Scheme to be used in a word processor’s Spell Checker to make it easier to see the misspelled word that is being highlighted.
- To hide Visual Hooked Areas when dialog boxes or menus are opened within a program to prevent the Hooks obscuring parts of the window.
The Situation Settings you create are saved within your Application Settings file.
Create a Situation Setting
You can create a Situation Setting in just a few simple steps.
To do this:
- Run the application and get into the situation you want to create a Situation Setting for, for example, open the target dialog box.
- Open the SuperNova or Dolphin ScreenReader Control Panel by pressing LEFT CONTROL + SPACEBAR. It is important to use the keyboard command to open the Control Panel as it ensures the current situation is identified by SuperNova and Dolphin ScreenReader.
- Open the "File" menu and then open the "New" submenu (ALT + F, N).
- Choose "Situation Settings".
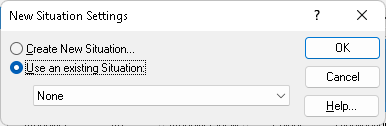
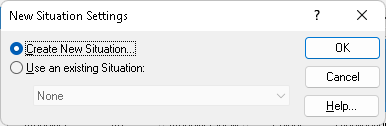
- Choose "Create new Situation" and select the "OK" button.
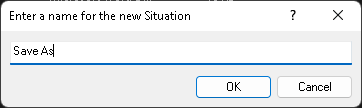
- In the dialog box that appears, give the new Situation Setting a meaningful name and select the "OK" button.
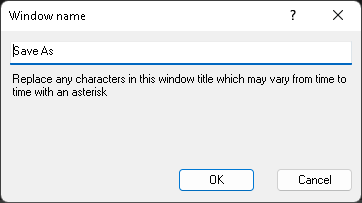
- Although it is possible to expand the range of windows your Situation can apply to using wild characters in the window name, in most cases this is unrequired, and the default text should be unchanged. Select the "OK" button to proceed.
And that is it! Your Situation Setting is created and will now be in use. You can check the Situation Setting currently in use by reading the SuperNova or Dolphin ScreenReader Control Panel Status Bar.
Tip: Giving the Situation Setting a meaningful name makes it easier to apply it to other situations within the program. For example, you could call the Situation Setting names like "Color Scheme Off", "Magnifier Hooks Off", "Bold, italic and underlined text styles on", "Verbosity Low", etc.
Managing Application Settings files
It is strongly recommended that you take regular backups of your Application Settings files to ensure you can quickly and easily get setup again on a new computer.
You can backup Application Settings files by using the "Export" option in the "File" menu of the SuperNova and Dolphin ScreenReader Control Panel. Conversely, using the "Import" option will allow you to copy the Application Settings files back into your current setup.
You can also edit your Application Settings and Situation Settings including renaming, deleting, and adjusting the file properties from the "Edit" submenu of the SuperNova and Dolphin ScreenReader Control Panel (ALT + F, E).
Finally, as previously mentioned, SuperNova and Dolphin ScreenReader automatically saves your changes to settings in real-time, keeping your Application Settings up to date as you make changes. If you prefer to control when changes are saved, then you can deselect the "Always save user settings" check box.
To do this:
- Open the SuperNova or Dolphin ScreenReader Control Panel.
- Open the "General" menu and select "Startup Preferences" (ALT + G, S).
- Deselect the "Always save user settings" check box. The deselection of this check box provides access to the additional "Ask user" check box.
- If you want to be asked to save your settings when you quit SuperNova or Dolphin ScreenReader, select the "Ask user" check box. Conversely, de-select this option if you do not want to be prompted to save your changes.
- Choose the "OK" button.
If you do disable the automatic saving of settings, then you can manually save your changes by selecting the "Save Settings" item from the "File" menu of the SuperNova and Dolphin ScreenReader Control Panel.
Tip: disabling the automatic saving of settings is popular in public forums such as libraries and resource centres as it prevents one user changing settings that might adversely affect another user wishing to use the same computer at a later date.
Exercises
Please complete Exercise 13 in the SuperNova for Trainers Workbook.
If you have not downloaded this supplementary document, please click here to download the SuperNova for Trainers Workbook.
Summary
In this lesson you have discovered the role of Application Settings and Situation Settings and how you can use them to automate the changing of SuperNova and Dolphin ScreenReader settings. You have also learnt about the type of settings that can be saved to an Application Settings file and the ways in which you can manage these files.
In the next lesson you will be reviewing the scanning features available with SuperNova and Dolphin ScreenReader.
Quiz
Below are three sample quiz questions based on this lesson. Please spend no more than five minutes considering the answers to these questions.
- The SuperNova Control Panel Title Bar reports the current Application Setting file in use. Is this statement true?
- You can use Application Settings files to configure SuperNova to use a faster reading voice in a different app. Is this statement true?
- Situation Settings are a subset of Application Settings files. Is this statement true?
End of lesson
Thank you for completing this lesson. Please select 'Next Lesson' below to continue to the next part of this course.
To revisit a previous lesson, please scroll to the top of this page and choose the lesson from the Course Outline menu.
But before you move on, here are the answers to the quiz questions:
- False.
- False.
- True.
