
Course Outline
15. Cameras
Overview
Welcome to lesson 15 of 19 in the Trainer's Course. In this lesson you'll learn about support for the magnification, capture and conversion of images from a video camera using the SuperNova Connect & View feature.
Lesson objectives
After studying this lesson, you will be able to:
- Correctly name the SuperNova feature that enables you to view and magnify printed material using a supported camera and state the rule of thumb that ensures camera compatibility.
- Correctly describe five types of actions SuperNova can perform on the image from the camera.
- Clearly describe two methods you can use to capture and convert the image from the camera to text using SuperNova.
This lesson should take no more than twenty minutes to complete.
This lesson applies to:
- SuperNova Magnifier.
- SuperNova Magnifier & Speech.
- SuperNova Magnifier & Screen Reader.
Note that the reference to the Optical Character Recognition (OCR) functionality within this lesson does not apply to SuperNova Magnifier. SuperNova Magnifier does not include OCR capabilities as this is a speech function.
Magnifying with a video camera
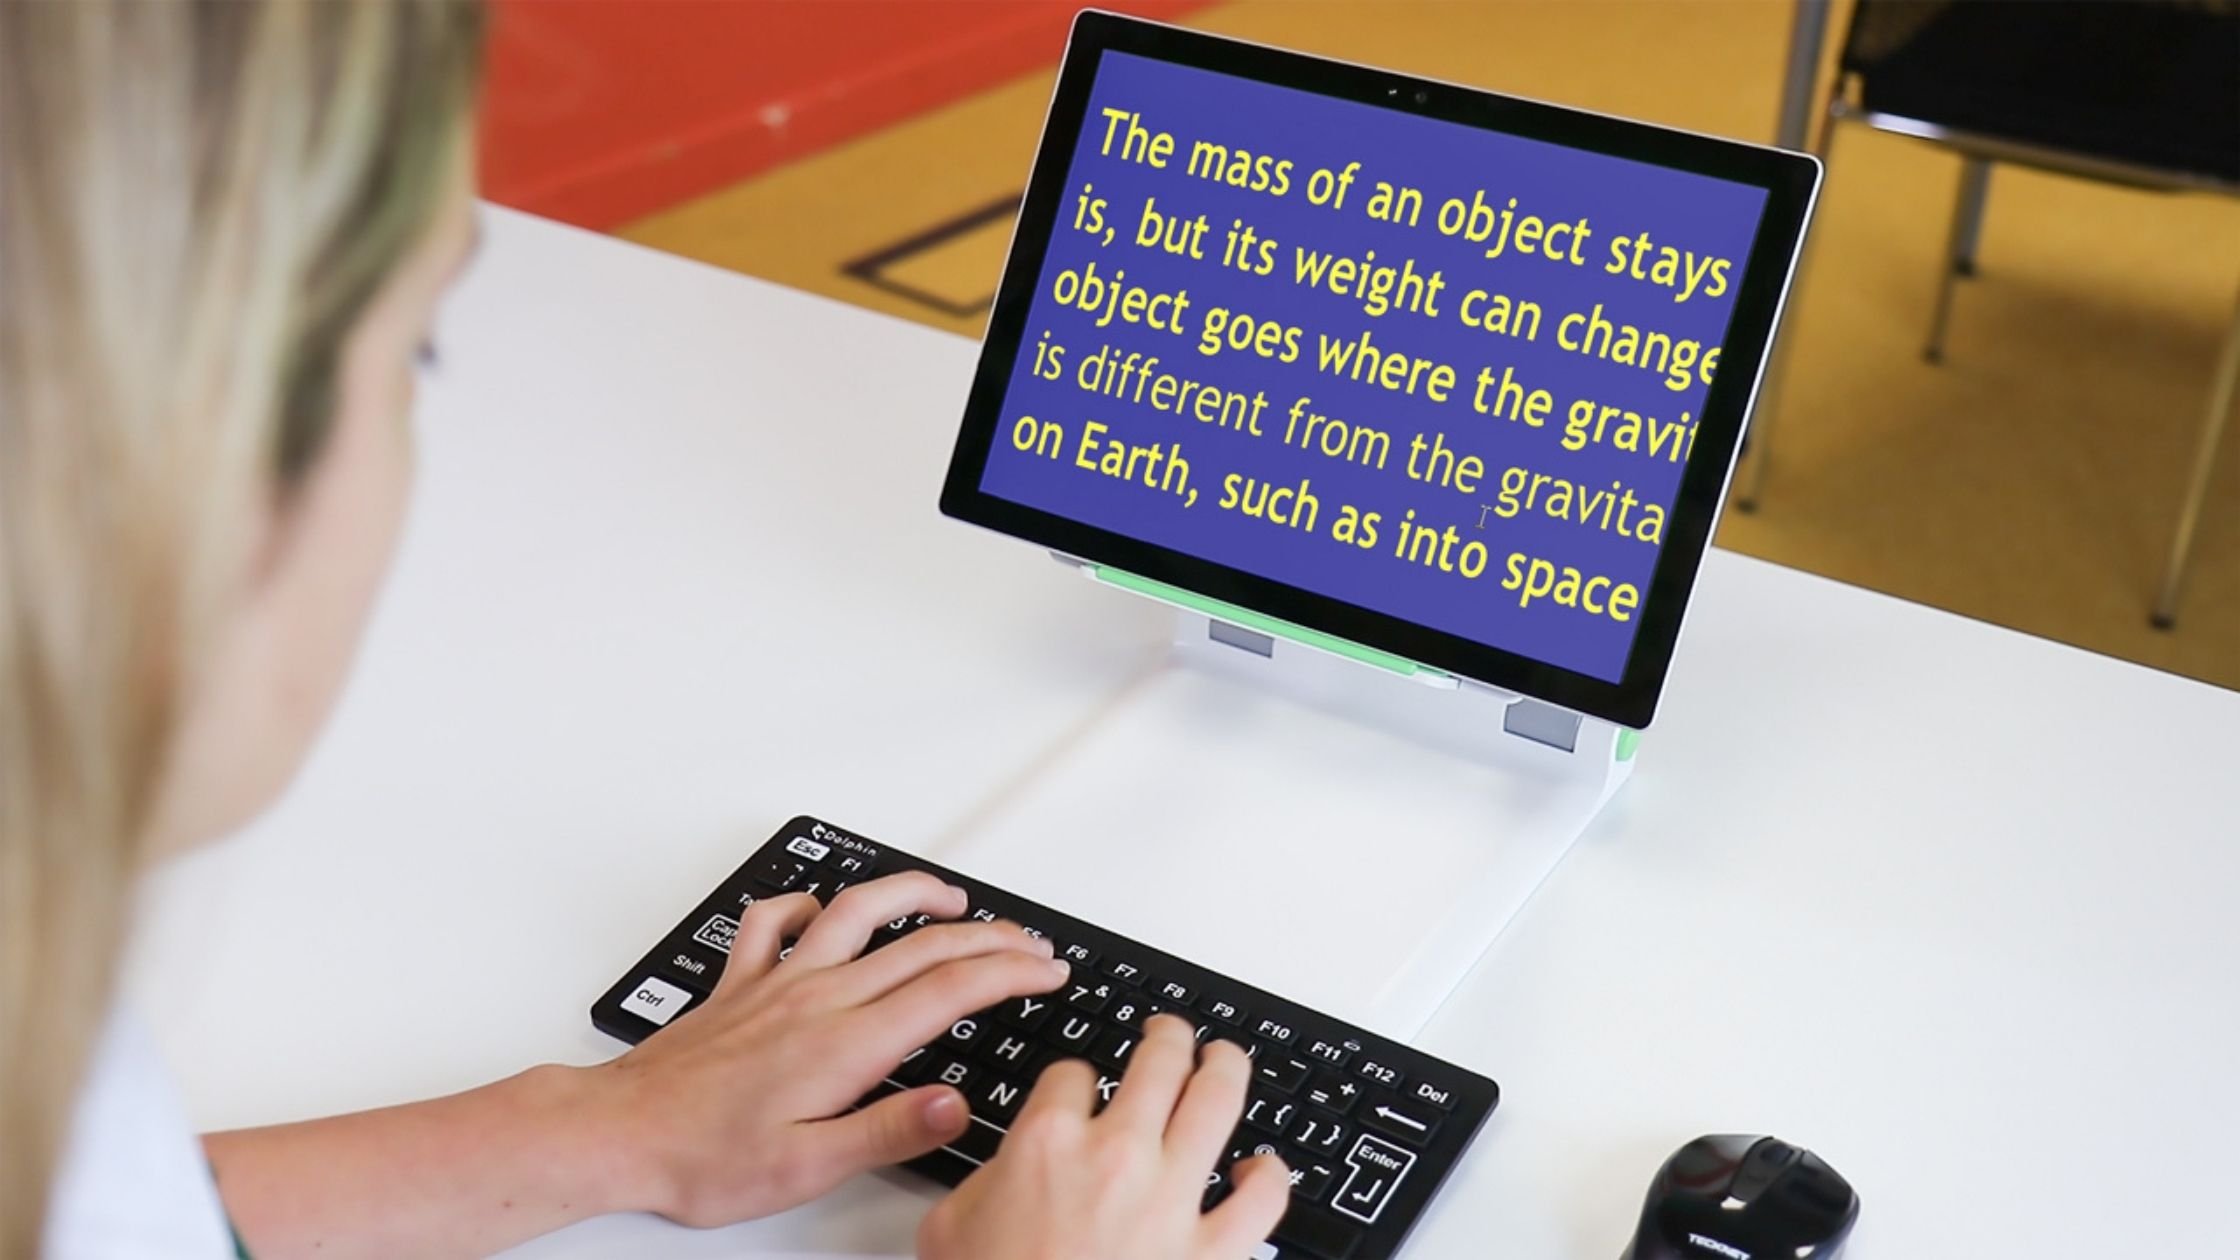
You can use SuperNova to magnify the output from a digital camera onto your computer screen. This enables you to view letters, magazines, newspaper articles, worksheets, handouts, labels, photographs and any other print material at a magnification level that suits your vision.
Today, most computer packages include an HD digital camera and for those that don't, the purchase of a suitable HD document camera and stand is relatively inexpensive. As a guide, any camera supporting Skype video calls is suitable but for best results you will need an HD camera with autofocus, delivering 1080p or higher video resolution with automatic low-light correction.
In addition, you should:
- Use a stand to hold the camera on the desk to ensure the camera is secure and stable over the items you want to view.
- Ensure you position the camera close to your computer screen to make it easy to adjust the items you want to view while still being able to comfortably view the screen.
- Make sure your camera is in a safe, clear, well-lit area on your desk to avoid shadows falling across the items you want to view.
For the latest list of supported devices, visit Supported cameras.
Using your camera with SuperNova
You can view your camera's output by turning on "Connect and View".
To do this, do one of the following:
- Select the "Connect and View" option from the "visual" menu in the SuperNova Control Panel (ALT + V, O).
- Select the "Connect & View" button from the “Visual” tab of the SuperNova Control Panel.
- Use the assigned keyboard command.
| Function | Desktop - Default NumPad Set | Laptop - Universal Set |
|---|---|---|
| Toggle Connect and View | ALT + NUMPAD ENTER | LEFT SHIFT + CAPS LOCK + 0 |
When you turn on "Connect and View" a portion of your screen shows the feed from the camera.
By default, SuperNova selects your primary camera, and shows the camera window on the top half of the screen. You can choose an alternative camera (if more than one is available), and change the position and size of this window through the "Connect & View Settings" dialog box (ALT + V, N).
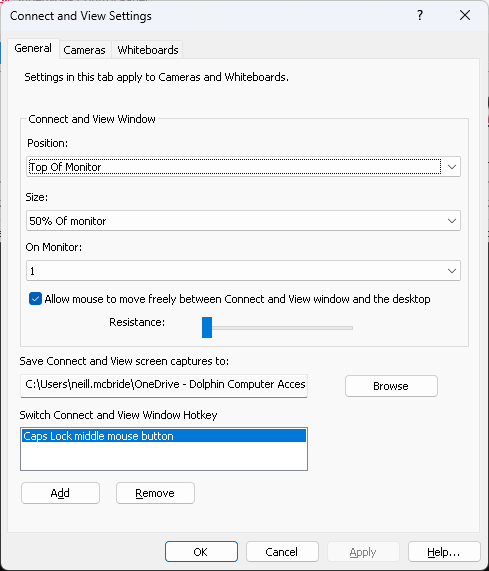
You can dock the camera window to the top, bottom, left or right side of the screen and you can set the camera window to fill 80%, 50% or 20% of the screen area. Alternatively, you can set the camera window to "Full screen".
In Full Screen View, the camera feed fills your computer screen. In this View, you can slide your mouse pointer off the edge of the screen to switch between the camera and the desktop or you can use the keyboard command, CAPS LOCK + MIDDLE MOUSE BUTTON.
Key Toolbar options
You can manipulate the image presented by the camera through the options available in the Toolbar. You can also perform many of these adjustments using keyboard commands.
You can:
- Magnify the image.
You can use the magnification buttons to control the size of the image in the camera window. You can also magnify the image using the same keyboard command and touchscreen gestures you use to magnify your desktop. You can also pan the image using the same mouse, touch gestures and panning keyboard commands you use to explore the desktop. This enables you to explore the image at a magnification size you feel comfortable viewing while avoiding the necessity to reposition the document under the camera. - Rotate the image.
You can rotate the image by ninety degrees at a time, enabling you to easily rectify those times when you find yourself viewing a printed document that is upside down or viewing labels printed at an unexpected angle. - Change the colour of the image.
You can change the colours of the image to make viewing a more comfortable experience. You can click the “Colour Schemes” button to cycle through the available schemes, which include high contrast colour schemes. You can also use the same keyboard command that turns on and off your Colour Scheme on the desktop to cycle through the available schemes. - Auto-focus (only available if your camera supports this feature).
You can disable the automatic focus function of a camera with this Toolbar option. You may wish to turn off this function if you find the camera regularly attempting to refocus on what it sees as a changing subject. - Optical zoom (only available if the camera supports this feature).
Optical zoom means your camera is processing the image. This will result in a sharper image, especially when focusing on an image at a distance. For example, you may want to use optical zoom to frame a teacher’s blackboard at the front of a class. Once in focus, you can switch back to digital view to magnify the image. Digital view provides a faster way to process the image. - Lock image.
The Lock Image button lets you freeze the screen on the current image. This allows you to explore the image in more detail without the possibility of the image changing. Although available when using a camera, you may find this option more useful when viewing output from an interactive whiteboard. This is discussed in more detail in the next lesson. - Capture image.
You can copy the current image to the Windows Clipboard using this Toolbar option. The image captured is the full image, irrespective of the size of magnification you are using. Once captured, you could copy the image to a document or use the SuperNova Scan and Read "From Clipboard" option to convert the image to text. - OCR image.
You can convert the current image to text using this OCR option. The image processed is the full image, irrespective of the size of magnification you are using. Once processed, the conversion will open in the SuperNova Doc Reader for editing. This option is discussed in more detail later in this lesson.
As mentioned above, you can also use keyboard commands to perform many of the Toolbar actions.
| Function | Desktop - Default NumPad Set | Laptop - Universal Set |
|---|---|---|
| Expand or Collapse Toolbar | LEFT CONTROL + BACKSLASH | LEFT CONTROL + BACKSLASH |
| Cycle Split Screen Views | LEFT CONTROL + NUMPAD 7 | LEFT SHIFT + ALT + M |
| Increase magnification | LEFT CONTROL + NUMPAD PLUS or CAPS LOCK + MOUSE WHEEL UP | ALT + EQUALS or CAPS LOCK + MOUSE WHEEL UP |
| Reduce magnification | LEFT CONTROL + NUMPAD MINUS or CAPS LOCK + MOUSE WHEEL DOWN | ALT + MINUS or CAPS LOCK + MOUSE WHEEL DOWN |
| Pan image | RIGHT CONTROL + ARROW KEYS | RIGHT CONTROL + ARROW KEYS |
| Rotate image clockwise by ninety degrees | LEFT CONTROL + NUMPAD 1 | PAGE UP |
| Cycle through alternative colour schemes | LEFT CONTROL + NUMPAD 0 | LEFT SHIFT + ALT + C |
| Toggle Auto Focus Mode (if supported by your camera) | LEFT CONTROL + NUMPAD 3 | F7 |
| Toggle between Digital (software) and optical (hardware) Zoom Mode (if supported by your camera) | LEFT CONTROL + NUMPAD 4 | F6 |
| Copy full image to Clipboard | CAPS LOCK + P | CAPS LOCK + P |
OCR process
As an alternative to the "Scan and Read" process, you can use the "OCR" button to capture and convert the image. The image converted is the full image, irrespective of the amount visible in the camera window.
Once processed, you can switch between different views and manipulate the image.
You can switch to:
- Text View.
Text View shows the text extracted from your image. You can read aloud the text by clicking the "Play" button to start and stop the reading or you can press the SPACEBAR key. You can also use the Arrow Keys to read through the text. - Image View.
Image View enables you to view the original image. You can scroll the image by holding down the LEFT MOUSE BUTTON while moving the mouse or, if you have a touchscreen device, you can scroll the image by sliding your finger across the screen. In Image View you can use the “Document” option to create annotations and highlight passages of text for ease-of-reference in the future. The "Documents" option also enables you to navigate through any additional pages you have scanned, delete additional pages, scan and append new pages and export your pages to other apps. - Split Screen View.
When using Split Screen View the Text View and Image View appear side-by-side enabling you to read the text and view the image at the same time. You can choose to position the windows with either a horizontal or vertical split.
Tip: If you choose to export your converted image to Microsoft Word, you can choose to either convert preserving the documents full layout or convert preserving just the documents formatting. If you use a screen reader, choosing to retain just the formatting provides a more accessible document.
When you choose to OCR an image, an original copy of your document will also be saved to your Documents folder. You can find the files in a subfolder called "Supernova". By default, the files are named snova_clipboardXXX.xml (where XXX is a number with the highest number being your most recently exported document).
To re-open these files in the Doc Reader:
- Open the SuperNova Control Panel.
- Open the "Media" menu, "Scan and Read" submenu, and choose "From file" (ALT + M, S, F). Alternatively, open the "Media" tab in the Button Bar and select the "Open file" button.
- Browser and select the file you want to open. You may wish to change the "File type" to "Doc Reader" if your file list is extensive.
Summary
In this lesson you reviewed the requirements, benefits and setup of using a digital camera with SuperNova. You learnt that you are able to view, magnify, capture, annotate and convert the images you view through the camera, providing you with a low cost video magnifier.
If you would like to learn more about the packages Dolphin offer to students in education, visit the Connect and Learn pages on the Dolphin website.
In the next lesson you will continue to look at "Connect & View ", focusing on connecting and viewing the output from an interactive whiteboard.
Quiz
Below are three sample quiz questions based on this lesson. Please spend no more than five minutes considering the answers to these questions.
- SuperNova enables you to magnify the output from a digital camera onto your computer screen through the Connect & View feature. Is this statement true?
- You must be using a SuperNova edition that provides speech output to make use of the Connect & View OCR capability. Is this statement true?
- The window that contains the feed from your camera can only be viewed in Full screen. Is this statement true?
End of lesson
Thank you for completing this lesson. Please select 'Next Lesson' below to continue to the next part of this course.
To revisit a previous lesson, please scroll to the top of this page and choose the lesson from the Course Outline menu.
But before you move on, here are the answers to the quiz questions:
- True.
- True.
- False.
