
Course Outline
7. Speech Support
Overview
Welcome to lesson 7 of 21 in the Trainer’s Course. This lesson will introduce you to the key speech features available with SuperNova and Dolphin ScreenReader, enabling you to get familiar with the common settings you may want to adjust to meet your requirements.
Lesson objectives
After studying this lesson, you will be able to:
- Correctly explain the process to change voice parameters such as the speed and volume of the voice as well as the steps to change synthesizer language and change synthesizer.
- Correctly explain how to reduce the amount of information SuperNova and Dolphin ScreenReader announces when navigating windows.
- Accurately state the different typing modes available with SuperNova and Dolphin ScreenReader and propose the type of typist that may apply each mode.
This lesson should take no more than thirty minutes to complete.
This lesson applies to:
- SuperNova Magnifier & Speech.
- SuperNova Magnifier & Screen Reader.
- Dolphin ScreenReader.
Controlling speech output
Voice parameters
As you become familiar with a synthesizer voice, you are likely to want to change the speed of the voice so that you can work more efficiently, reading some less important documents quickly and reading more important documents at a slower pace to make comprehension easier.
In a comparable way, as your working environment background noise rises and falls throughout the day, you may need to change the volume of the voice.
The changing of your voice parameters can be easily achieved through the "Speech" options within the SuperNova and Dolphin ScreenReader Control Panel and with the use of keyboard commands.
| Function | Desktop - Default NumPad Set | Laptop - Universal Set |
|---|---|---|
| Toggle voice on and off | LEFT CONTROL + 0 | LEFT CONTROL + ALT + 0 |
| Temporarily mute voice until key press or focus change | LEFT CONTROL | LEFT CONTROL (or RIGHT CONTROL) |
| Increase speed | LEFT CONTROL + LEFT SHIFT + EQUALS | LEFT CONTROL + ALT + PAGE UP |
| Reduce speed | LEFT CONTROL + LEFT SHIFT + MINUS | LEFT CONTROL + ALT + PAGE DOWN |
| Increase volume | LEFT CONTROL + EQUALS | LEFT CONTROL + ALT + EQUALS |
| Reduce volume | LEFT CONTROL + MINUS | LEFT CONTROL + ALT + MINUS |
You can also make adjustments to speech parameters in Layered hotkey mode. Press CAPS LOCK + SPACEBAR, followed by S to enter the Speech layer. Here, you can use the TAB key to explore the available options, press ENTER to select an item, or use the stated shortcut key to make a change, for example, press CAPS LOCK + SPACEBAR, then S, and then O, to toggle speech on or off.
Tip: A change to the volume of the voice does not alter the volume of the computer. For this reason, you should ensure your system volume is at a comfortable level before adjusting the volume of the voice. This will ensure you avoid encountering excessively loud sound effects or media playback in the future.
Changing voice, language, and synthesizer
SuperNova and Dolphin ScreenReader support a variety of popular synthesizers. These include:
- Nuance Vocalizer Expressive.
- Microsoft OneCore.
- Eloquence.
- Orpheus.
- Plus, all synthesisers developed to the Microsoft SAPI 5 standard.
Both Vocalizer Expressive and Microsoft OneCore provide high-quality human-sounding voices. For most locales, Vocalizer Expressive is supplied with SuperNova and Dolphin ScreenReader, while Microsoft OneCore comes free as part of the latest Windows operating systems.
Most synthesizers support a range of languages, and each supported language may offer one or more voices to choose from. Typically, you will find a variety of male and female voices available.
Tip: The synthesizers and voices that make up your Dolphin package will vary depending on your locale. A full list of the synthesizer and voices supplied with each locale can be viewed on the Dolphin website.
Changing voice
To choose an alternative voice requires you to make your selection through the SuperNova and Dolphin ScreenReader Control Panel. There is no keyboard command available to switch between voices offered by a synthesizer.
To change voice, either:
- Open the SuperNova or Dolphin ScreenReader Control Panel.
- Switch to the "Speech" page of the Button Bar.
- Select the "Voice and language" button.
- Open the "Voices" submenu and select a voice.
Or,
- Open the SuperNova or Dolphin ScreenReader Control Panel.
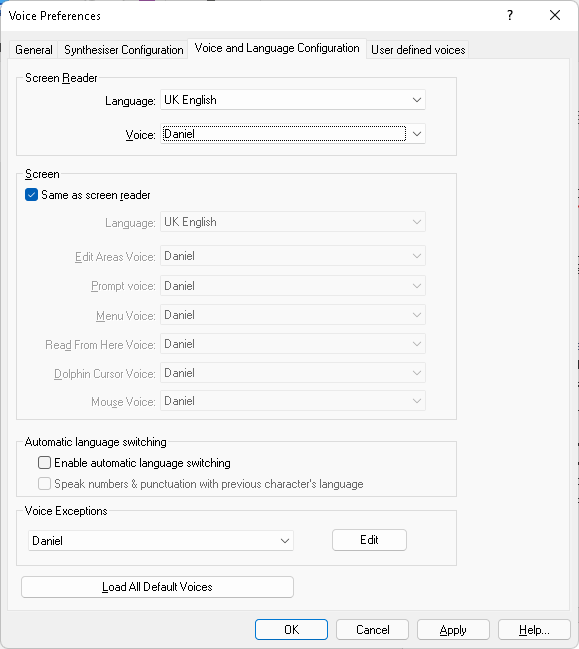
- Open the "Speech" menu and select "Voice Preferences" (ALT + S, P).
- Switch to the "Voice and Language Configuration" page and choose a voice from the "Voice" list.
- Choose the "OK" button.
Although, as stated, it is not possible to switch between voices using a keyboard command, you can choose to use a different voice in different situations.
For example, you can use a different voice when you are in an:
- Edit area.
- Prompt area such as a dialog box.
- Menu.
- Spreadsheet
And when using the SuperNova and Dolphin ScreenReader functions of:
- Read From Here.
- Dolphin Cursor.
- Reading text under the mouse pointer (SuperNova only).
You may find assigning a voice to a specific situation useful if you require clarification on which type of area or feature you are using in SuperNova and Dolphin ScreenReader.
Once quick way to access the required settings is to use Layered hoykeys:
- Press CAPS LOCK + SPACEBAR, S, L. The "Voice Preferences" dialog box opens showing the "Voice and Language Configuration" page.
- In the "Screen" group, deselect the "Same as screen reader" checkbox.
- Select the voice you wish to use for each situation and choose the "OK" button.
Changing synthesizer language
You can enable SuperNova and Dolphin ScreenReader to automatically switch to a voice that supports the current text language to make reading a more fluent experience. The automatic language switching requires the text to be part of a different script. For example, switching from a Latin script to Arabic, Chinese (Mandarin), Greek, Hebrew, Hindi (Devanagari) or Russian (Cyrillic). You must have the supporting language installed with your synthesiser for language switching to occur.
To enable automatic language switching: Press CAPS LOCK + SPACEBAR, S, L, and select "Enable automatic language switching" check box.
To also prevent numbers and punctuation symbols causing a language switch, select the "Speak numbers & punctuation with previous character's language" checkbox.
If you prefer not to enable automatic language switching or where it is not possible to determine the script language, for instance, where the same alphabet is used by different languages, you can use a hotkey to apply the change.
The hotkeys are:
- LEFT CONTROL + PERIOD to switch to the next language.
- LEFT CONTROL + COMMA to switch to the previous language.
Tip: Please contact Dolphin or your local Dolphin Dealer for information on obtaining alternative Vocalizer Expressive languages.
Changing synthesizer
If you find the voices or language support available with the synthesizer insufficient, then you may want to use an alternative synthesizer.
To change synthesizer:
- Open the SuperNova or Dolphin ScreenReader Control Panel.
- Open the "Speech" menu and select "Voice Preferences" (ALT + S, P).
- Open the "Synthesiser Configuration" page and choose the "Select Synthesiser" button.
- Select an alternative synthesiser from the list of available synthesisers and choose the "OK" button.
- Once you have selected a synthesiser, you can switch to the "Voice and Language Configuration" page to review the voices supplied with the synthesiser.
- When done, choose the "OK" button.
As previously mentioned, it is not possible to switch voices using a keyboard command, but it is possible to switch between synthesizers. When you switch to a different synthesizer, you will be using the last voice you used with the synthesizer.
| Function | Desktop - Default NumPad Set | Laptop - Universal Set |
|---|---|---|
| Switch synthesizer | LEFT CONTROL + LEFT SHIFT + LEFT BRACKET (or RIGHT BRACKET) | LEFT CONTROL + CAPS LOCK + S |
Tip: You can enable and disable synthesizer’s through the "SAM Configuration" settings. SAM is the Synthesizer Access Manager supporting SuperNova and Dolphin ScreenReader. You can access SAM through the Start menu, through the system tray icon and through the "General" menu, "Advanced Options" dialog box in the SuperNova and Dolphin ScreenReader Control Panel (ALT + G, A).
Correcting mispronunciations
No matter what synthesizer or voice you choose, there will always be a word that the voice fails to correctly pronounce. This may be a strange place name, company name, a person's surname or web address that causes a strange utterance.
You can resolve this by making use of the SuperNova and Dolphin ScreenReader Exceptions Dictionary.
To add a word into the Dictionary:
- Press CAPS LOCK + SPACEBAR, S, L.
- In the "Voice exceptions" group, select the "Edit" button (ALT + T).
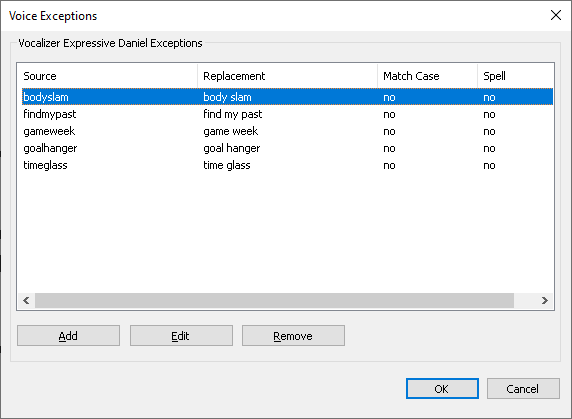
- Select the "Add" button and in the "Add exception" dialog box that appears, enter the Source Word and the Replacement Word. Note that you may need to misspell the replacement word for speech to announce the word in an appropriate manner. Use the "Speak" button to check pronunciation.
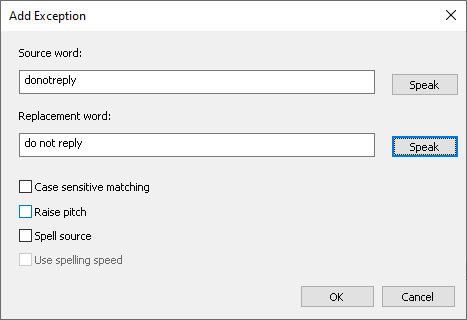
- Use the further options to determine when the rule is applied, for example, you can make the rule case sensitive to ensure words like "AT" is managed differently to "at".
- When done, select the "OK" button.
And you are good to go. The mispronunciation rule you have added into your Exceptions Dictionary will be in use.
Controlling Verbosity
IMPORTANT: The following information is specific to SuperNova Magnifier & Screen Reader and Dolphin ScreenReader. SuperNova Magnifier & Speech does not include verbosity announcements.
When we talk about Verbosity, we are referring to the speech that tells you about the type and state of the current focus. In its simplest form, Verbosity is the speech output that describes the object that has focus and is an extension to the visible text.
The role of Verbosity is to help you understand where you are and what to do.
For example, if you go into the SuperNova Control Panel and open the "File" menu by pressing ALT + F, speech may say:
"File menu, New has submenu, shortcut n, one of eight"
Yet only the words "File" and "New" are the focused items on the screen. The screen reader provides the remaining information.
You will find information output through the Verbosity Scheme extremely helpful if you are unable to visually follow the focus on the screen. However, if you can view the screen comfortably, you may find the verboseness of the speech unnecessary and perhaps overwhelming.
To resolve this, you can change your level of verbosity. SuperNova and Dolphin ScreenReader include four Verbosity Schemes to choose from, plus the ability to create or customize your own personal schemes.
The four default schemes are created to meet a particular set of user requirements and are called Minimum, Low, Medium and High Verbosity Schemes.
Below is a brief description of each Verbosity Scheme.
- Minimum.
This Scheme provides no control information and is one you may prefer to use if you can comfortably view the focus on the screen and use the mouse pointer to get around your programs. - Low.
This Scheme provides basic information about the control type and state. It is one you may prefer to use if you can comfortably view the focus on the screen and you are familiar with navigating your program using your keyboard. - Medium (default scheme).
This is the default Verbosity Level and provides all the important information about the current control type and state. It is one you may prefer to use if you like to learn more about the current focus, for example, check box status, menu shortcuts, etc. - High.
This Scheme provides all the essential information about the control type and state plus helpful keyboard instructions for interacting with the control type. It is one you may prefer to use if you navigate your program using the keyboard and require help on what keyboard commands to use when interacting with each control type.
There are many varied reasons why you may prefer one Verbosity Level over another, and you may even prefer to have different levels of Verbosity in different applications depending on your familiarity with a program.
Tip: You can also choose a Braille Verbosity Level in the same way as you choose a Speech Verbosity Level. For many users of Speech and Braille, the Verbosity Levels they choose will differ between these output methods. Such a user may have a low Braille Verbosity Level and a higher Speech Verbosity Level. The reason for this is because a Braille display has a limited number of cells to present the output.
You can choose your Speech Verbosity Scheme through the SuperNova or Dolphin ScreenReader Control Panel or with the use of a keyboard command.
| Function | Desktop - Default NumPad Set | Laptop - Universal Set |
|---|---|---|
| Cycle Speech Verbosity | CAPS LOCK + EQUALS | CAPS LOCK + V |
To change the Speech Verbosity Scheme using Layered hotkeys: Press CAPS LOCK + SPACEBAR, S, then V until you select your Scheme. Once selected, press ESCAPE to exit Layered hotkey mode.
Alongside the four default Speech Verbosity Schemes, you are able to create your own custom Scheme. In creating or modifying a Scheme, you can control all aspects of the speech output including changing the name of a control and changing the order the information is announced.
For example, a "Check box" could become a "tick box" or the control type "button" could be set to be read before the label, for instance, turning "OK button" into "button OK". The options and possibilities are numerous; however, they do require a degree of technical understanding that extends beyond this lesson.
If you do wish to create your own Speech Verbosity Scheme, then you can find the required options in the "Speech Advanced Options" dialog box.
To go there:
- Open the SuperNova or Dolphin ScreenReader Control Panel.
- Open the "Speech" menu and choose "Advanced Options" (ALT + S, A).
- Select the "Verbosity Schemes" tab.
- Create, explore, and modify as you require.
If you wish to make modifications and are unsure what steps to follow, then we recommend you contact Dolphin or your local Dolphin dealer for assistance.
Typing modes
In the final section of this lesson on controlling speech output, we’ll take a brief look at controlling what is spoken as you type.
You can set speech to announce when typing:
- Characters.
- Characters and words.
- Words.
- Nothing.
In general, the setting you choose will depend upon your typing ability or your ability to see what you are typing on the screen.
For example, if you are a novice typist, then you may prefer to have the reassurance that comes from speech echoing each letter you type but, as your typing skills grow, you may prefer to hear only the words you type. Alternatively, if you can comfortably see the text you are typing on the screen, then you may prefer speech to say nothing as you type.
You can choose a typing mode by going to the "Character Echo" dialog box in the SuperNova or Dolphin ScreenReader Control Panel.
To do this:
- Open the SuperNova or Dolphin ScreenReader Control Panel.
- Open the "Speech" menu and choose "Character Echo" (ALT + S, C).
- Select your typing mode.
- Choose the "OK" button.
The "Character Echo" dialog box also includes two additional settings, which determine whether you are told when a new line occurs and whether you require the space character to be announced.
Enabling the "New line announcement" check box means you will be told when your typing has wrapped on to a new line by speech saying, "new line". Speech will also announce "new line" when you use the ENTER key to insert a line break at the end of a line.
The "Announce space" check box lets you stop the space character being announced as you type. You may want to turn off the announcement of the space character if you are finding it repetitive and a distraction as you work. This setting only applies to the "Character" and "Character and Words" typing modes.
You can also cycle through the four different typing modes using a keyboard command.
| Function | Desktop - Default NumPad Set | Laptop - Universal Set |
|---|---|---|
| Cycle typing modes | CAPS LOCK + SEMI COLON | CAPS LOCK + 2 |
You may find the keyboard command helpful if you want to quickly switch from one typing mode to another, for example, you may want to switch from "Words" when typing your document to "Characters" when saving your document to ensure you enter the correct filename convention.
Using the keyboard command means you can switch back and forth between typing modes quickly and easily. You can also make this change using Layered hotkeys, Press CAPS LOCK + SPACEBAR, S, and Y until you make your required selection. Once selected, press ESCAPE to exit Layered hotkey mode.
Exercises
Please complete Exercise 7 in the SuperNova for Trainers Workbook.
If you have not downloaded this supplementary document, please click here to download the SuperNova for Trainers Workbook.
Summary
And that concludes this lesson. In this lesson you have learnt about the key speech settings available with SuperNova and Dolphin ScreenReader. You learnt how you can adjust voice parameters, choose an alternative voice, language and synthesizer and learnt how to correct mispronunciations by the voice.
You have also learnt how to alter the amount of information your screen reader says when you are navigating menus, dialog boxes and other elements. Finally, you also learnt how to change what is spoken as you type and the hotkey that will enable you to quickly make this adjustment.
In the next lesson you will be continuing to examine the speech features available with SuperNova and Dolphin ScreenReader.
Quiz
Below are three sample quiz questions based on this lesson. Please spend no more than five minutes considering the answers to these questions.
- You can use a keyboard command to switch to another voice available with your synthesizer. Is this statement true?
- Using the SuperNova hotkey to change the volume of your synthesizer's voice also effects your system's volume. Is this statement true?
- You should reduce speech verbosity if you find speech is saying to much when you navigate menus and dialog boxes. Is this statement true?
End of lesson
Thank you for completing this lesson. Please select 'Next Lesson' below to continue to the next part of this course.
To revisit a previous lesson, please scroll to the top of this page and choose the lesson from the Course Outline menu.
But before you move on, here are the answers to the quiz questions:
- False.
- False.
- True.
